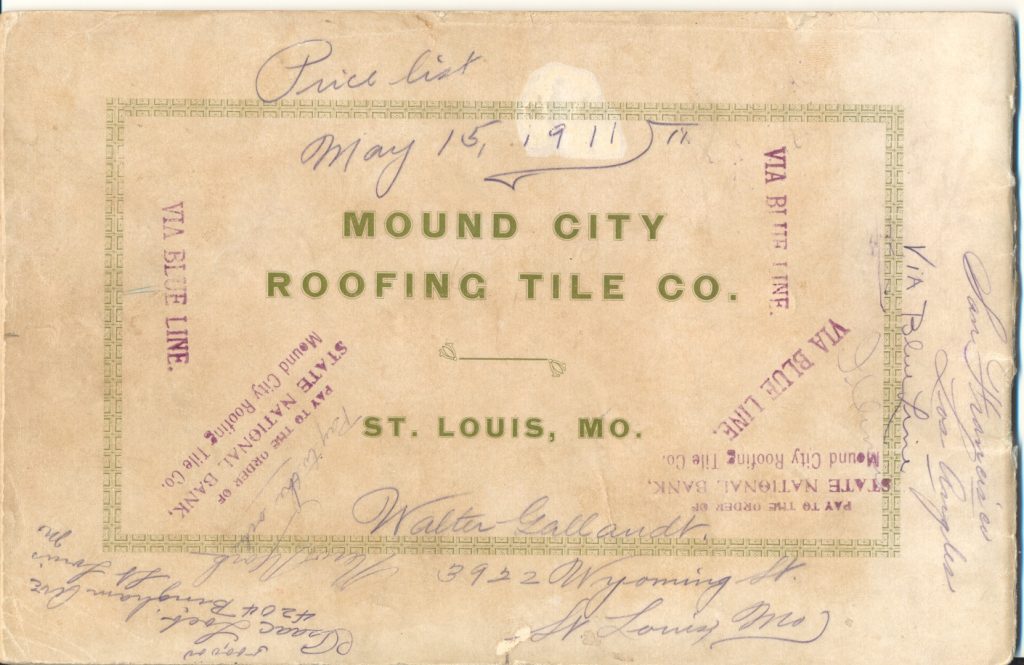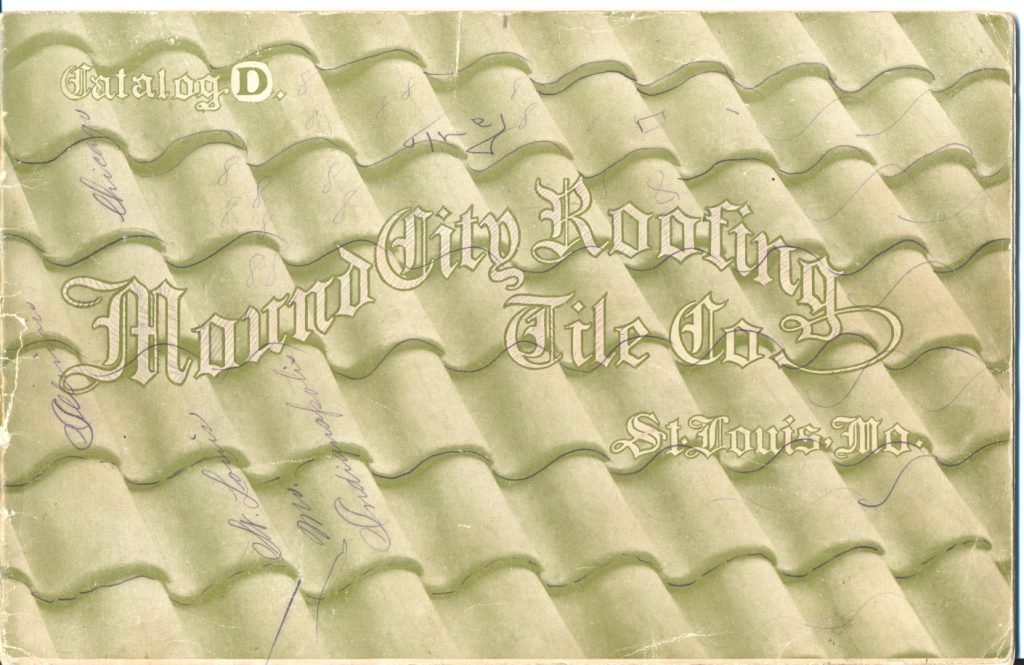
Selected scans and transcribed text from an original “Catalog D” from Mound City Roofing Tile Co. of St. Louis, Missouri, with pencil annotations for current prices in 1911. From a Mound City Roofing Tile employee’s archival collection. The catalog may have been used as in-office reference by company management.
That terrra cotta roofing tile is now acknowledged to be the best product for protection of buildings from storm and rain has been proven by its increased and continued acceptance, and as evidenced by reviewing many of the modern structures such as residences, schools, libraries, universities, churches, railway depots, freight buildings, factories, stables, etc., where we find that the above material has been generously used with satisfactory results.
 Looking forward to the expectant demand for this product in the future, The Mound City Roofing Co. was organized for the manufacture of terra cotta roofing tile with all the accessory trimmings of the most modern shapes, highest grade and superior quality in various colors and glazes. The above assurance is here given on the satisfactory tests made of their clay which is especially and essentially adapted for the manufacture of terra cotta roofing tile.
Being centrally located in the heart of St. Louis, and having superior shipping facilities, we can easily reach any territory in the United States.
Our clay is of the finest grade of Shale and makes roofing tile of superior quality and color, burning a solid red throughout and burnt to a very high temperature which insures it against disintegration form the most sever climatic influences. It is also very compact and dense. In manufacturing our tile we employ none but skilled mechanics or experts that money can secure. This in connection with the most modern machinery and up to date plant in United States, enables us to produce a tile which is second to none manufactured in this country.
Roofing tile, without doubt is one of the best known non-conductors of both heat and cold when well burnt but not vitrified. An absolutely vitrified tile in a great many aspects has the same objectionable features as slate, namely: being brittle, a conductor of both heat and cold, will not absorb condensation which in certain climates and seasons of the year causes a constant drip, making a very unsatisfactory roof when used on open construction. Also when it is subjected to a high temperature from an adjoining fire, it will crack and fly all to pieces the same as slate. Well burnt shale roofing tiles will not break from excessive heat or from walking over them and when hung on strips and wired on roofs, will not break from the settling or structural motion of the roof as slate very often does.
Nothing can be more desirable than roofing tiles for a fore proof building; especially does this refer to buildings that are more or less exposed to the danger of fire caused from flying sparks from engines or from adjoining buildings on fire.
The initial cost of tile in some localities exceeds that of slate, but the ultimate economy is accepted by all who are familiar with its use. The hard burnt shale tile well laid on the roof will last indefinitely, while no other roofing material has this record. A well burnt shale tile in manufacturing is subjected to a temperature of about 2000 degrees Fahrenheit and will stand 200 % more heat than slate without injury to the tile.
Method of Laying Tile
It is an erroneous idea that interlocking roofing tiles are very difficult and expensive to lay: in fact it is just the opposite, for on account of being made to easily fit into each other, they are quickly and easily put in place. The interlocking feature dispenses with the use of elastic cement which must be used with plain Spanish tile.
There are two kinds of roof construction: one called closed construction and the other open construction.
In closed construction the roof is prepared just the same as the slate, being first sheathed, then covered with one layer of heavy roofing felt: held in place by common plaster laths laid vertically at twenty four inches center. On these are nailed one inch by two inch wooden strips laid horizontally and spaced according to length of the different kind of tile to be used. On these the tile are hung and wired to the roof.
In open construction the same method is used—1×2 wood strips are mailed directly to rafters or secured to steel trusses. Tile laid on open construction can be made water tight by laying spun oakum in joints to form a cushion or filling the joints on under side with cement mortar.
Vitreous Face Tile
Our vitreous face tile surpasses anything of its kind on the market. This class of tile, which is somewhat more expensive, is preferred by a great many architects for several reasons namely: being vitrified on the exposed surface will not absorb any moisture from outside: the opposite or under side being slightly absorbent prevents the possibility of dripping caused through condensation at certain seasons of the year: it will always remain clean and has one solid red color throughout the entire body of tile.
Colors and Glazes
Although the natural burnt color of our tile is a deep bright red, which is standard color and will be shipped on orders unless otherwise specified: we manufacture all the tile and trimmings in the catalogue in a full glazed finish in shades blending from dark to light of green, yellow, blue, brown, white and mottle: also a dull green finish which is produced direct by firing and not by artificial means after burning etc., such as sand blasting.
Glass Tile
We furnish glass tiles in shapes “A”, “C” and “S”, for introducing light through the roof. They can be placed where required and readily moved at any time, if so desired, as they are fac-similes of terra cotta tile in every particular, in shape and form.
Valley and Hip Tile
We furnish cut hip and valley tile, as well as cut and filled valley tile, at an additional charge. Roof plans and elevations, with measurements, must be furnished to do this work accurately.
Graduated Tile
Are made to order, to fit all kinds of towers.
Promenade Tile
For flat roofs of office buildings, apartment houses, etc.: are far in advance of gravel or composite roofs, as they shed the water much better. These tile, laid in asphalt, will make the best, cleanest and most substantial flat roofs, and are absolutely fire and water proof.
Shingle Tile
Better, handsomer and more durable than slate.
Trimmings
Trimmings made for hips, ridges and terminations of same, and if desired, from any design furnished by the architect.
Slate Roof Trimmings
As there is constantly a demand for terra cotta trimmings for slate roofs, we have devoted special attention to suitable and appropriate designs for this class of work.
General Specifications
Tile on Wood Strips
Cover sheathing with one layer of asphalt roofing paper weighing 30 lbs. to square. Fasten it down with plaster lath laid perpendicularly 24 inches on centers. Wood strip to be 1 in. x 2. in, surfaced one side and nailed horizontally over lath, spaced accurately, according to pattern of tile used. Top strip to finish 2 ½ inches from apex of roof, and can’t strip to be doubled. First strip must be set to allow eave course to project 2 inches into gutter to allow free drip.
All valleys to have 1 in x 2 in strips nailed at each side, over which to turn the valley metal.
All crestings and hip rolls to be laid in cement, colored to match shade of tile and all the joints are to be neatly pointed with same cement. A hip board of necessary thickness and width, according to size of hip roll, is to be well fitted and nailed to top of hip rafter for receiving and nailing hip roll to same.
Wiring
Each tile is gable and eave course and every third tile in body of roof must be securely fastened with No. 18 copper wore by attaching to lug on underside of tile, then passing wire through a galvanized staple driven into sheathing directly under lug and winding around nail at one side of tile.
Tile Laid by Nailing
Valley Metal
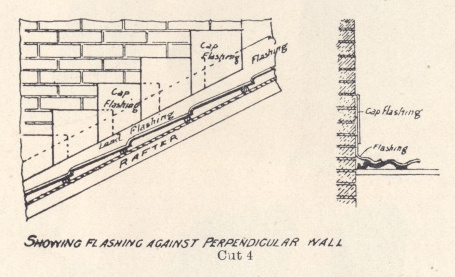
Flashing against Perpendicular Wall
The valleys are to be covered with metal which is to be well fitted over the valley strips and to extend beyond the outside of the same, not less than three inches on each roof. Separate pieces of roofing-felt are to be laid under the valley metal wide enough to extend well under the main roofing-felt on each side of the valley.
The roofing-felt is to extend over the top of the outer three inches of valley metal up to the valley strip on each side of valley gutter.
Where roofing tile comes against brick wall, it is to be fitted as closely as practicable and then lay lead or copper flashing well bent and fitted to the tile and also against wall not less than six inches high, then cover this flashing with cap flashing well and securely fitted into joints of brick work. (See illustration Cut 4)
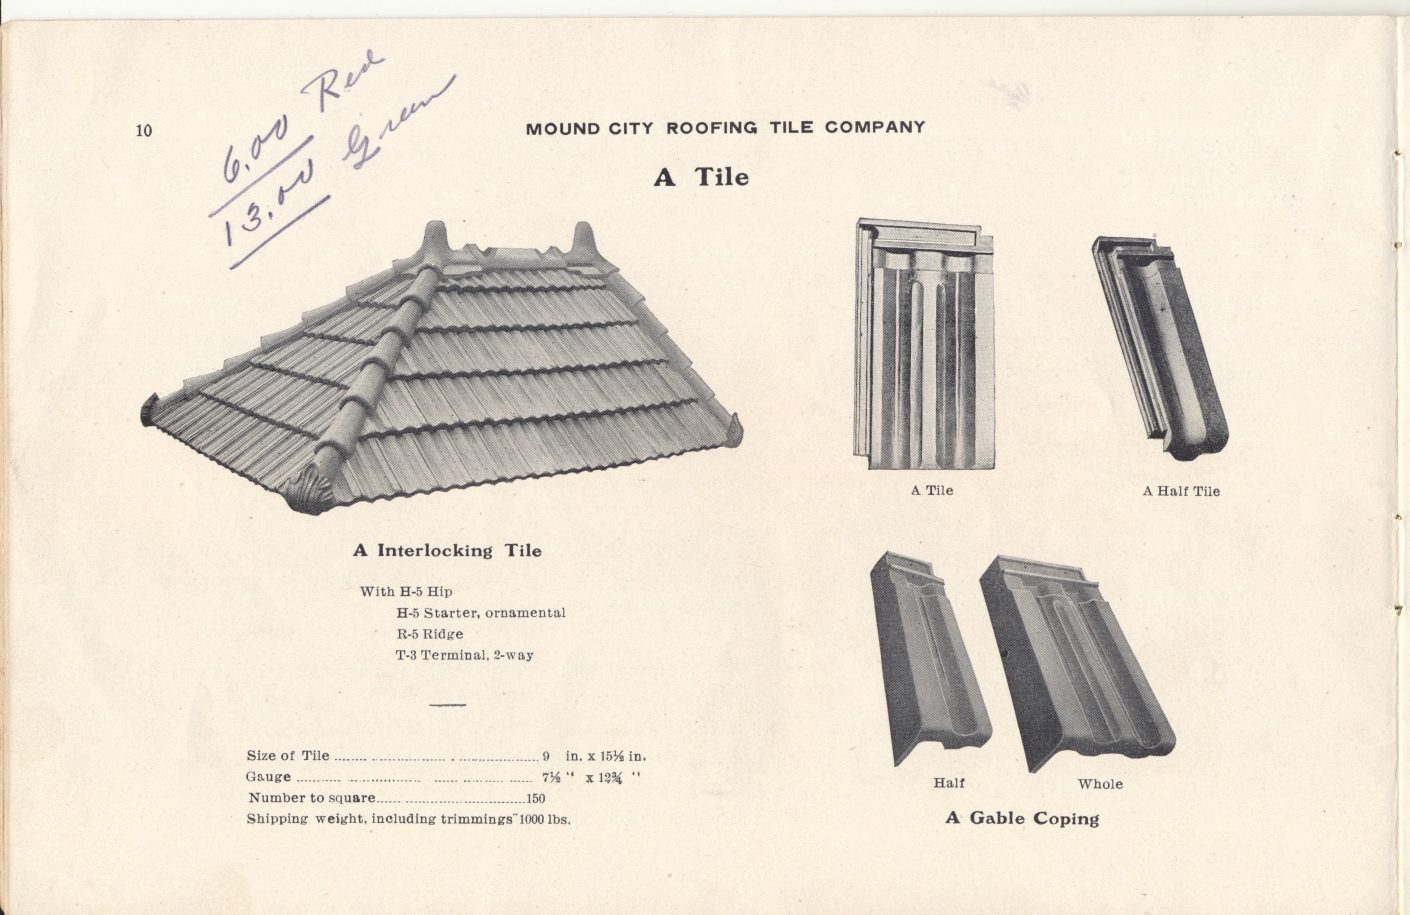
Mound City Roofing Tile Company “A Tile” is shown in this illustration. “A Tile” along with “A Half Tile” are shown in the upper right. Half and Whole Gable Copings are shown in the lower right. The Left side of the illustration shows how they are Interlocking Tile and also shows specifications such as size, gauge, number to square, and shipping weight including trimmings.
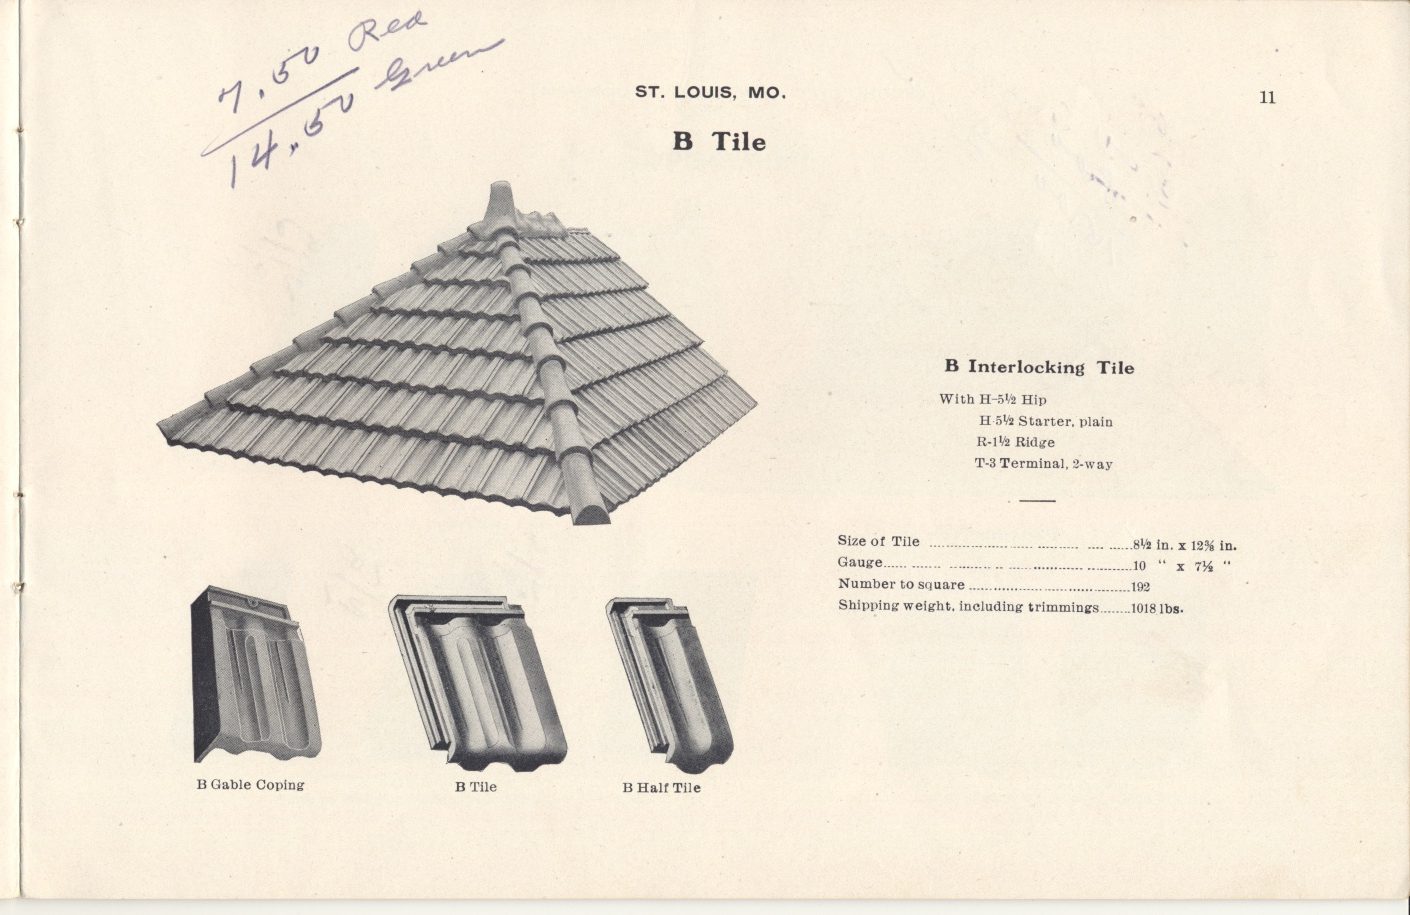
This illustration shows Mound City Roofing “B Tile” or B Interlocking Tile. In the upper left side of the illustration a section of roof shows B Interlocking Tile, below that illustration B Gable Coping, B Tile, and B Half Tile are shown. The right side of the illustration shows the specifications of B Tile such as the Size, Gauge, Number to Square, and Shipping weight, including trimmings.
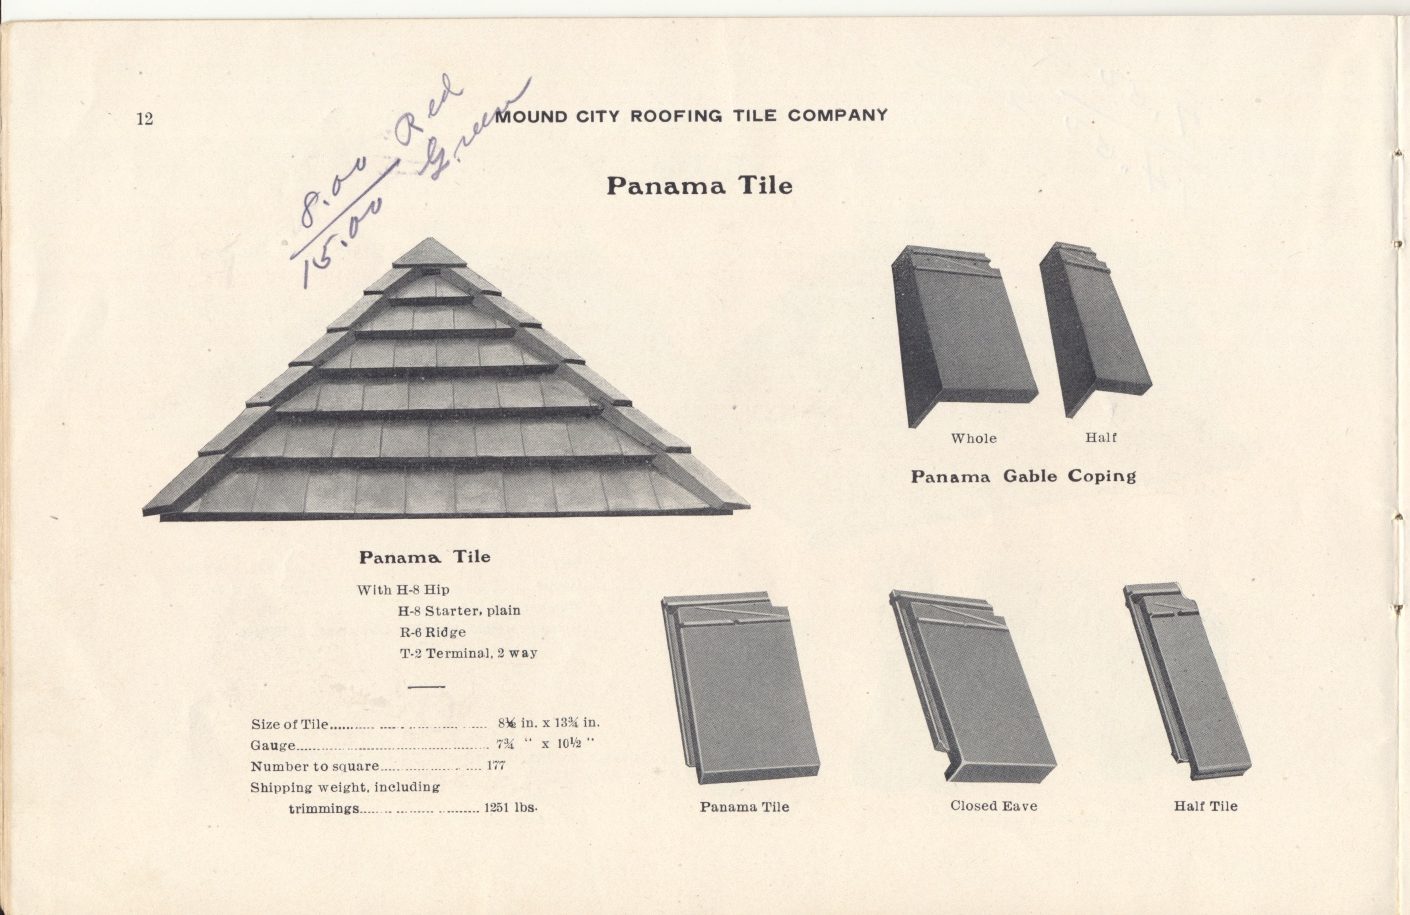
This illustration shows Mound City Roofing Panama Tile. The upper right side of the illustration shows Panama Gable Coping Whole and Half. Below in the lower right is shown the Panama Tile, Closed Eave, and Half Tile. The left side of the illustration shows a section of Panama Tile and the specifications such as the Size of the Tile, Gauge, Number to Square, and Shipping weight, including trimmings.
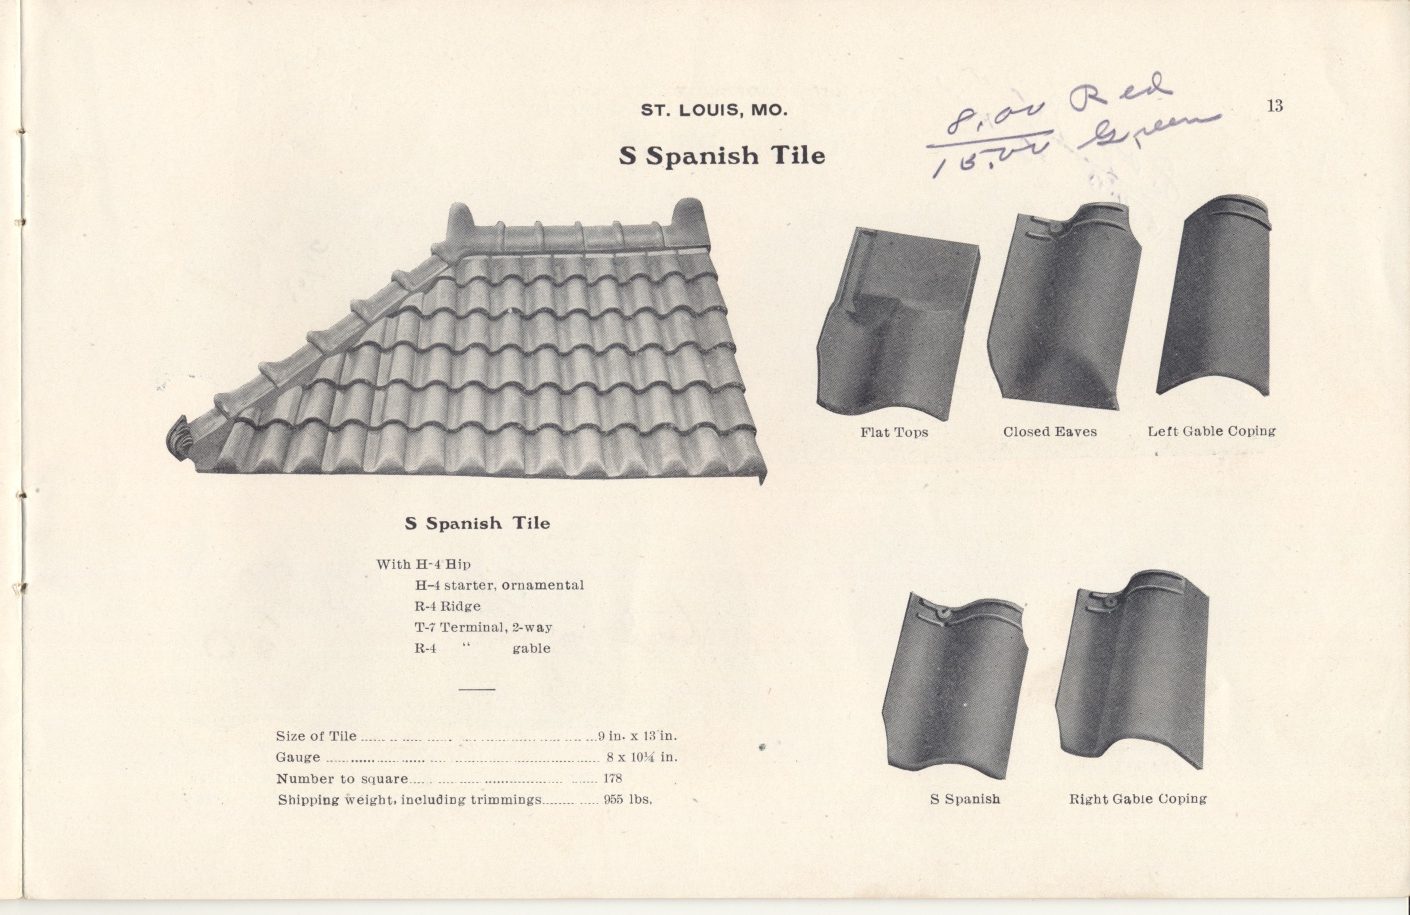
This illustration shows Mound City Roofing S Spanish Tile. The right side of the illustration shows S Spanish Tile Flat Tops, Closed Eaves, Left Gable Coping, S Spanish Tile, and Right Gable Coping. The left side of the illustration shows a section of S Spanish Tile and the specifications of the tile, such as Size of Tile, Gauge, Number to Square, and Shipping Weight, including trimmings.
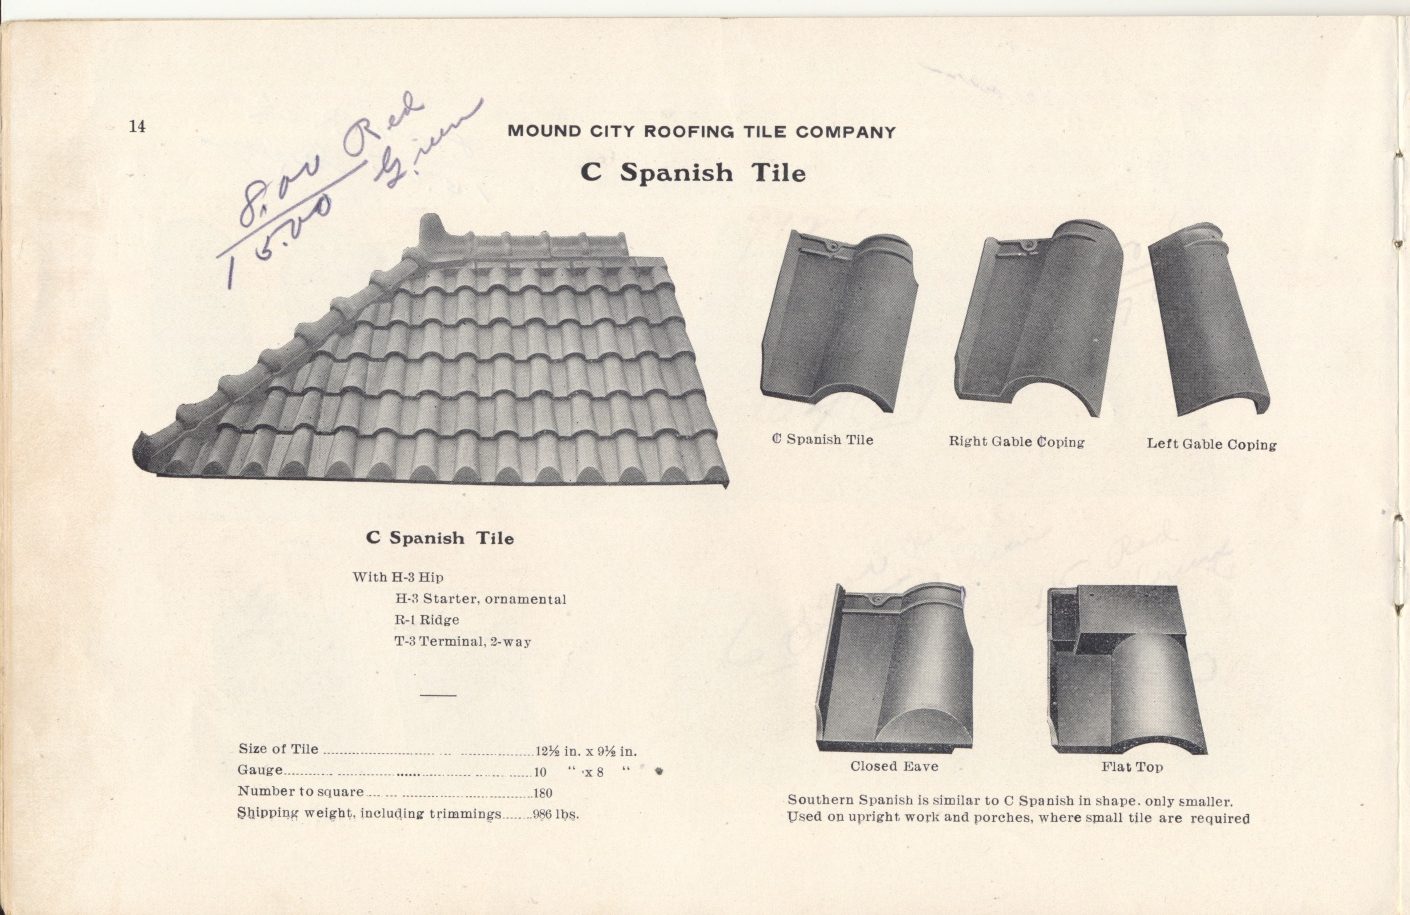
This illustration shows Mound City Roofing C Spanish Tile. The right side of the illustration shows C Spanish Tile, Right Gable Coping, Left Gable Coping, Closed Eave, and Flat Top. The left side of the illustration shows a section of C Spanish Tile and the specifications of the tile, such as Size of Tile, Gauge, Number to Square, and Shipping Weight, including trimmings.
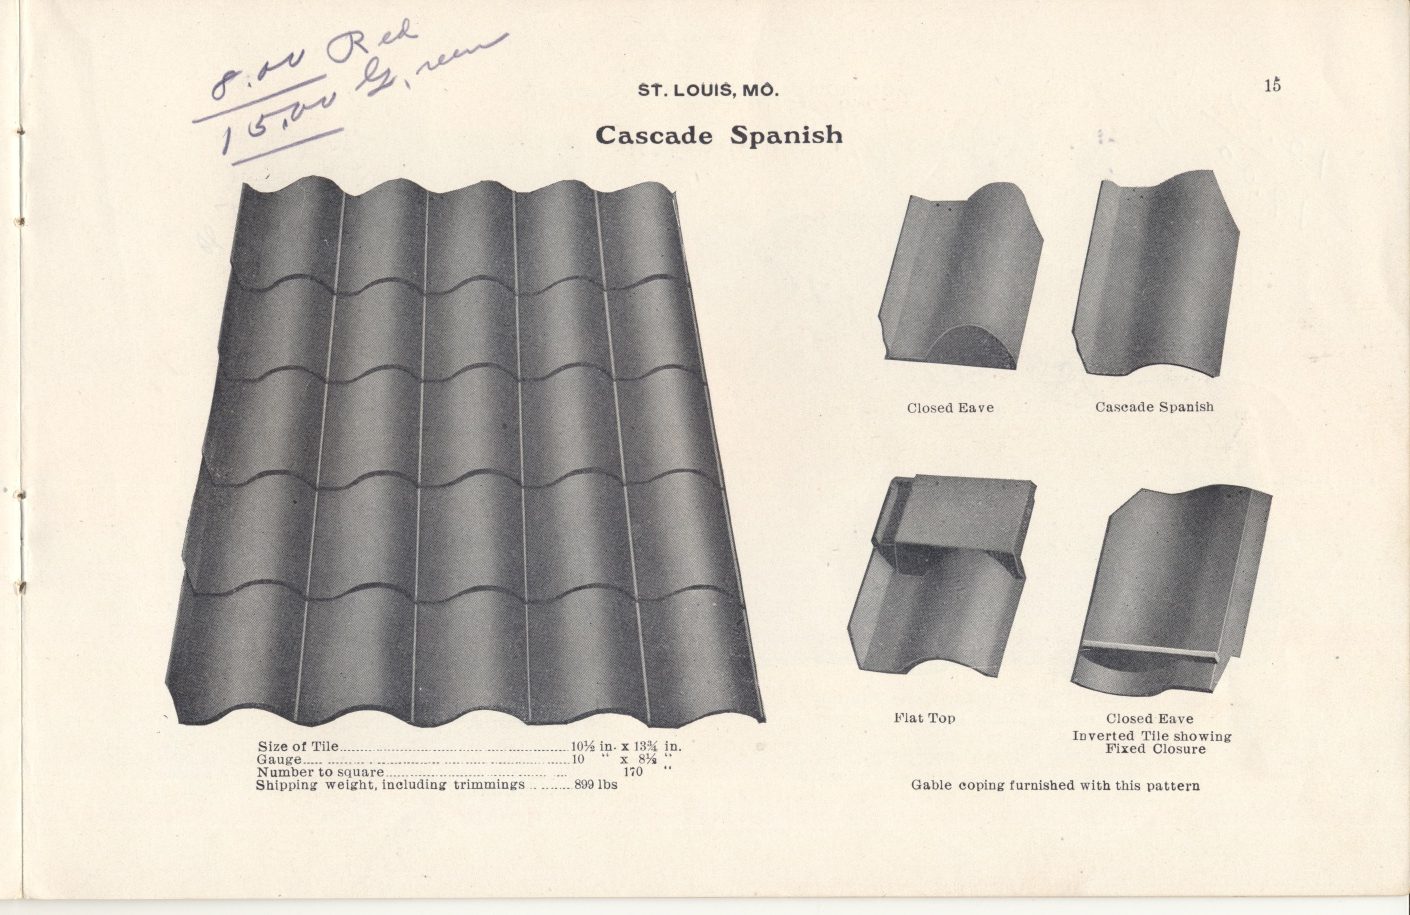
This illustration shows Mound City Roofing Cascade Spanish Tile. The right side of the illustration shows Cascade Spanish Tile, Closed Eave, Flat Top, and Closed Eave (Inverted tile showing fixed closure). The left side of the illustration shows a section of Cascade Spanish Tile and the specifications of the tile, such as Size of Tile, Gauge, Number to Square, and Shipping Weight, including trimmings.
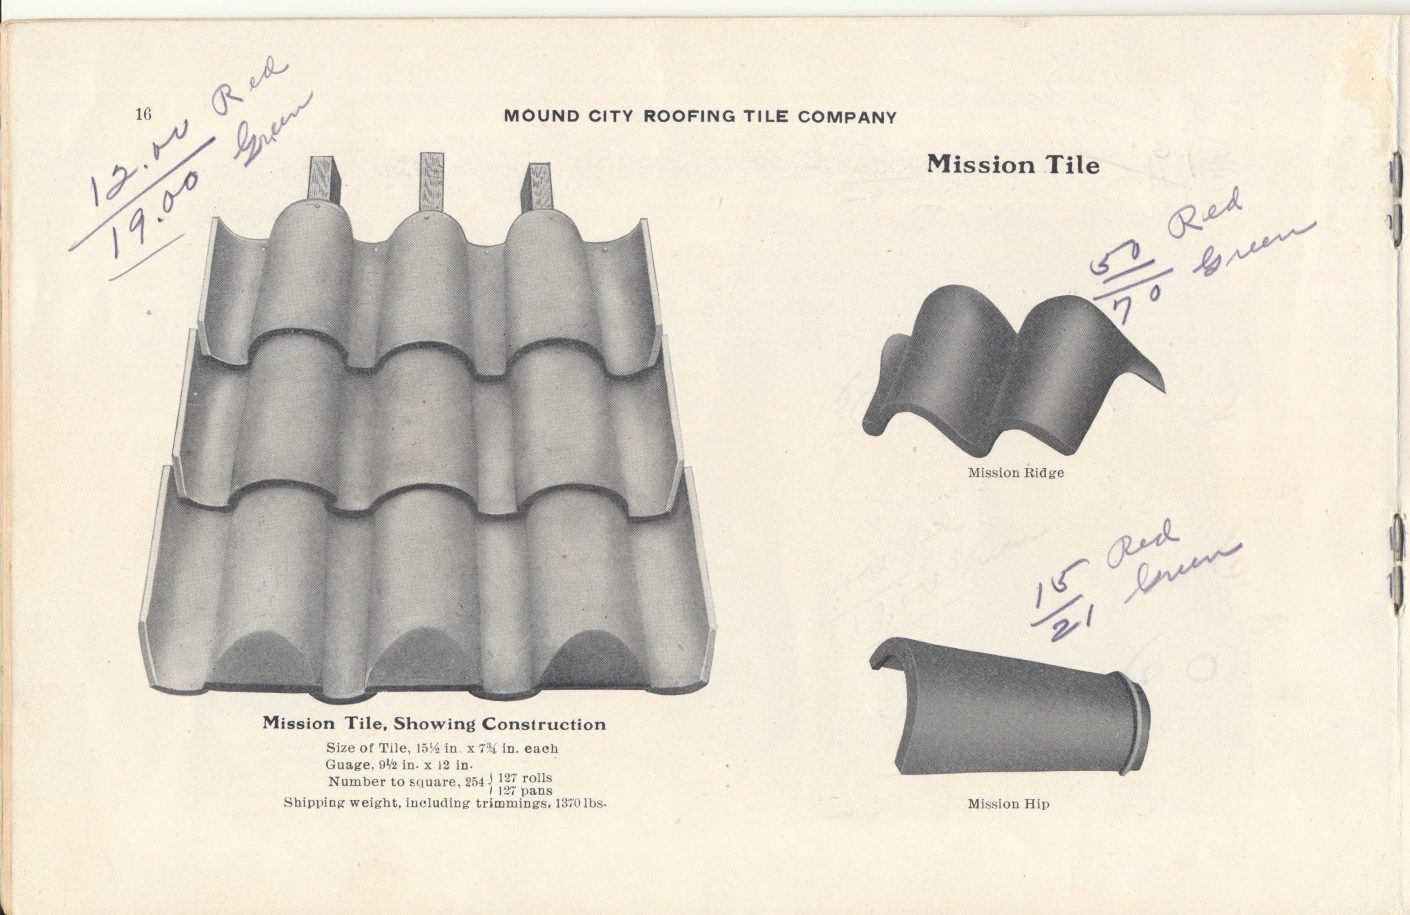
This illustration shows Mound City Roofing Mission Tile. The right side of the illustration shows Mission Ridge Tile and Mission Hip Tile. The left side of the illustration shows a section of Mission Tile and the specifications of the tile, such as Size of Tile, Gauge, Number to Square, and Shipping Weight, including trimmings.
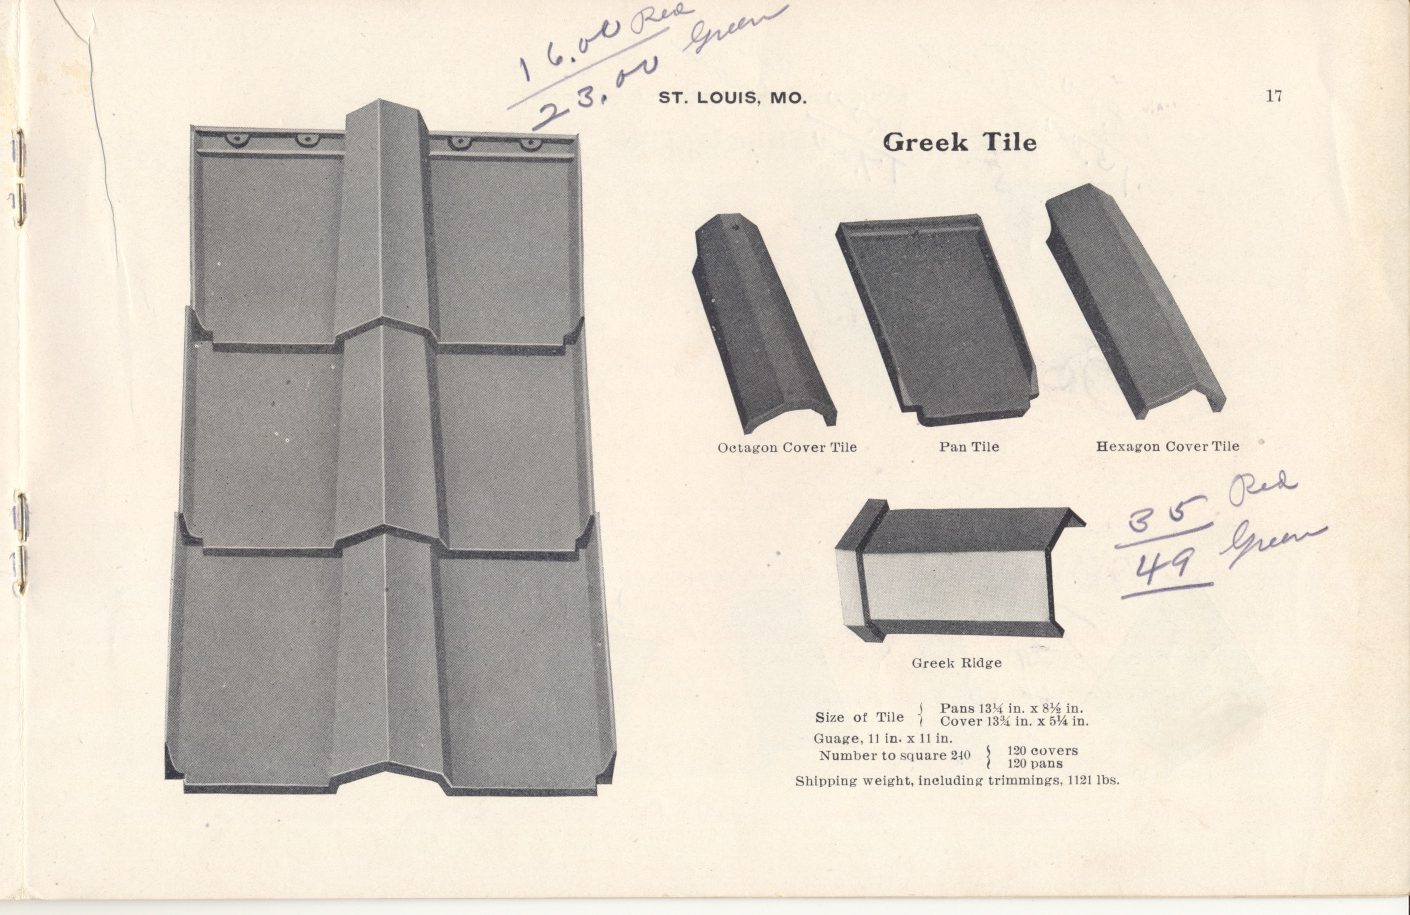
This illustration shows Mound City Roofing Greek Tile. The right side of the illustration shows Octagon Cover Tile, Pan Tile, Hexagon Cover Tile, and Greek Ridge Tile. The left side of the illustration shows a section of Greek Tile and the specifications of the tile, such as Size of Tile, Gauge, Number to Square, and Shipping Weight, including trimmings.
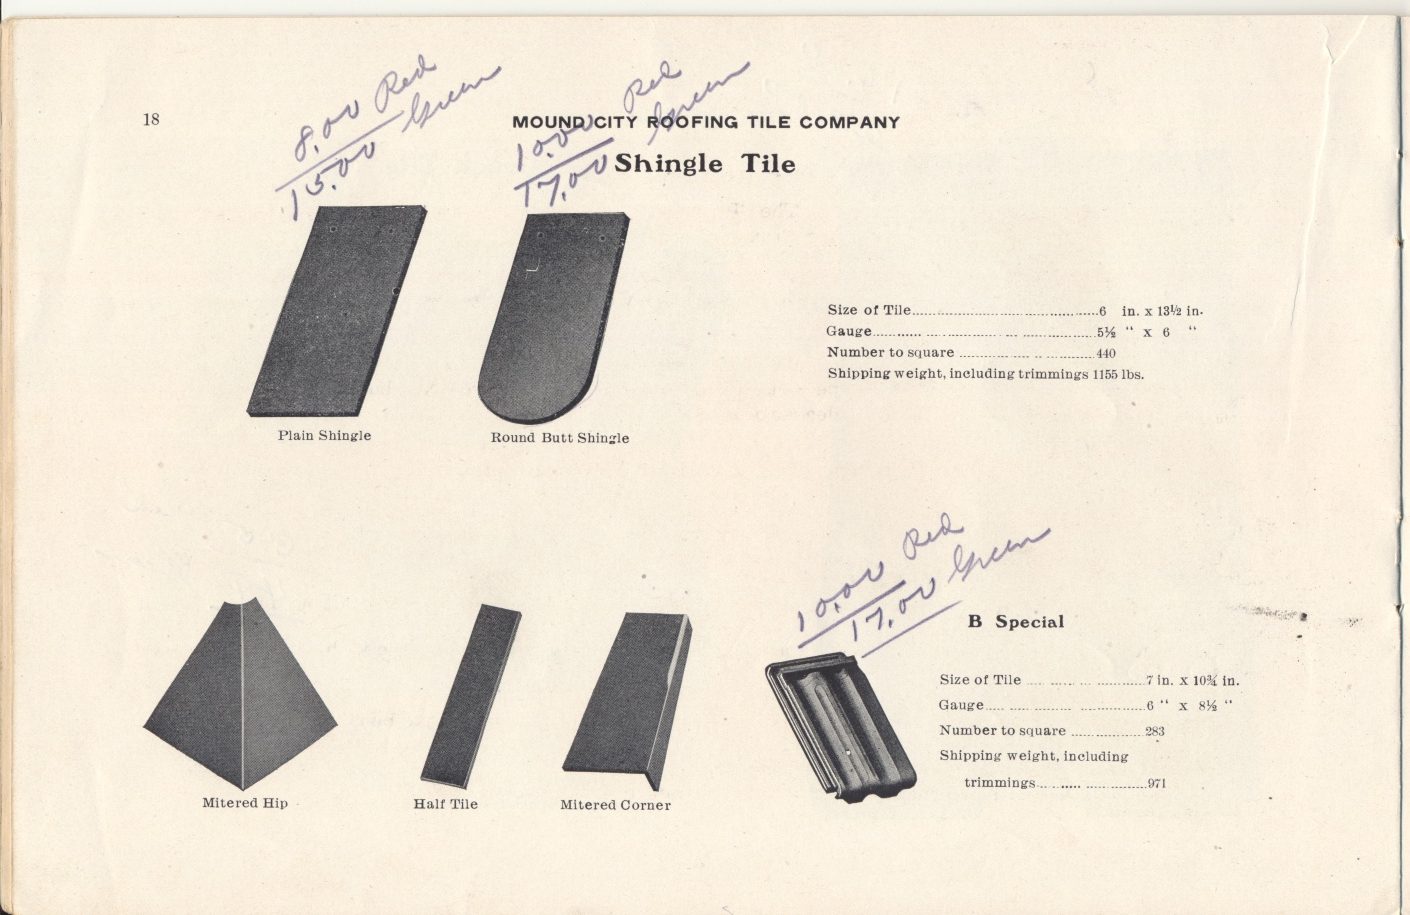
This illustration shows Mound City Roofing Shingle Tile. The left side of the illustration shows Plain Shingle, Round Butt Shingle, Mitered Hip, Half Tile, Mitered Corner, and B Special. The right side of the illustration shows the specifications of the Shingle Tile and the B Special tile, such as Size of Tile, Gauge, Number to Square, and Shipping Weight, including trimmings.
6in. x 9in. x 3/4in. thick; weight per square 938 lbs.
Number to square, 268.
6in. x 9in. x 1in. thick; weight per square, 1100 lbs.
Promenade Tile
The “Promenade” tile is made especially for covering flat roofs and promenades.
It is 6 in by 9 in by ¾ or 1 in., in size, laid in asphaltum with smooth face on top, which enables the water to easily run off with 1% fall.
This tile also makes a most excellent paving material. It is impervious to moisture, being a very compact body and burnt to a high degree of heat.
Specifications for laying Promenade Tile
First lay one dry sheet of building paper, every sheet lapping preceding one 2 inches. On this lay 4 ply No.2 14 lb. tarred felt. Mop between each sheet with hot tremolite.
Over this entire surface of felt laid, spread a uniform coat of hot tremolite, which is to be throughly set before laying of tile.
On this surface lay 6x9x1 inch thick hard burned red tile, all joints to be straight and left open not less than 3/8 of an inch.
Al tile is to be left clean and free from defects.
All eaves and outlets to have a copper duplex eave stop. All walls and skylight to be flashed and cap flashed with 14 oz. soft copper as follows:
*Base flashing 5 inches on roof or wall
*Cap flashing not less than 5 inches to extend 1 inch into brick joints, fastened with lead plugs and pointed with cement.

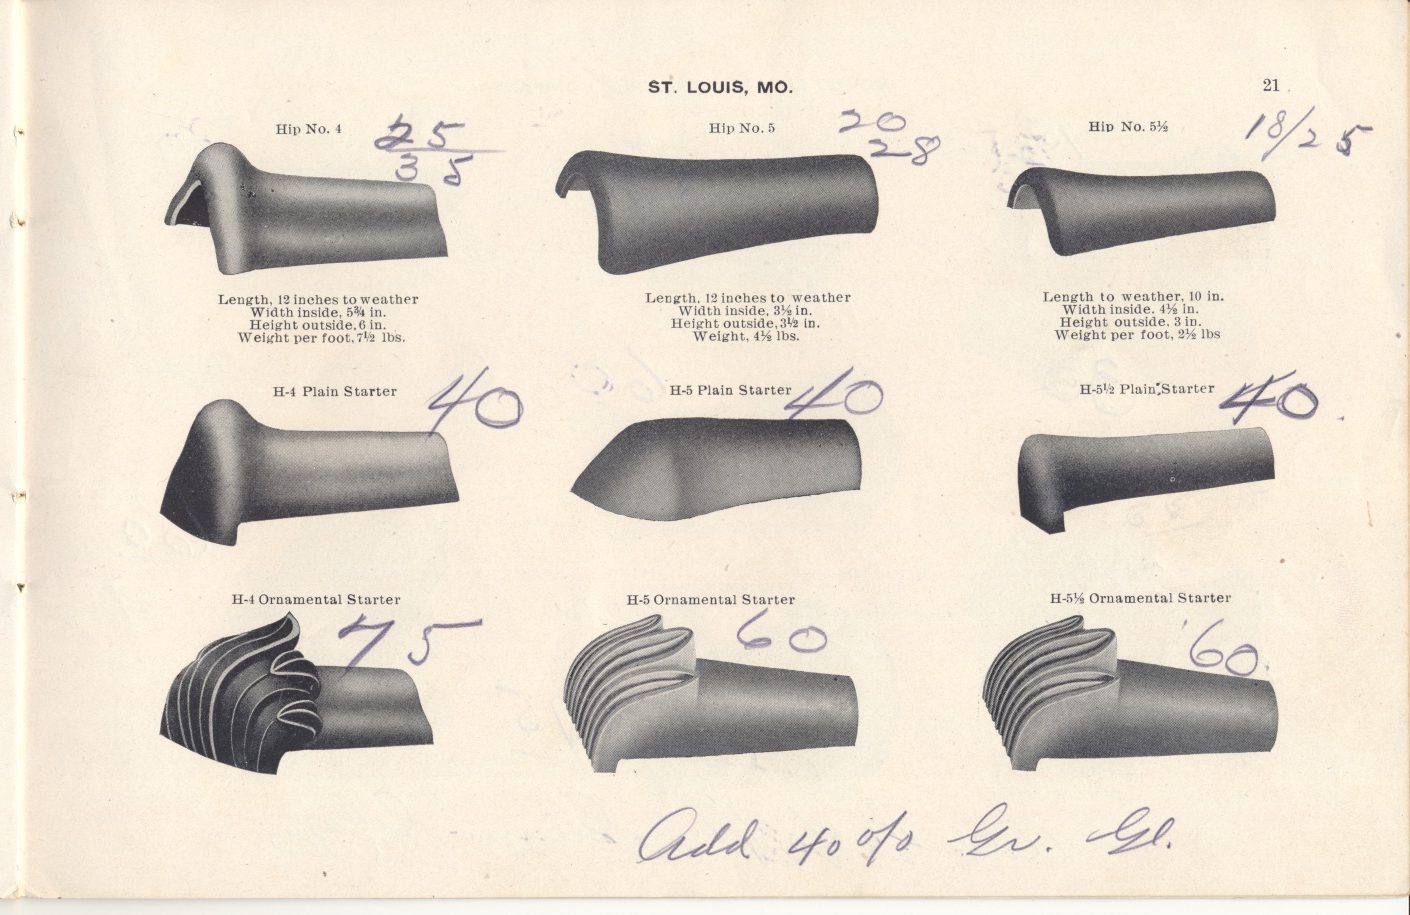
This illustration shows three hip tiles and the lengths, widths, heights, and weights for each of them.
Along with illustrations of three Plain Starters and below them three Ornamental Starters.
This illustration shows three hip tiles and the lengths, widths, heights, and weights for each of them.
Along with illustrations of three Plain Starters and below them three Ornamental Starters.

This illustration shows two hip tiles and the lengths, widths, heights, and weights for each of them.
Along with illustrations of two Plain Starters, two Ornamental Starters, and one Plain Hip Starter.
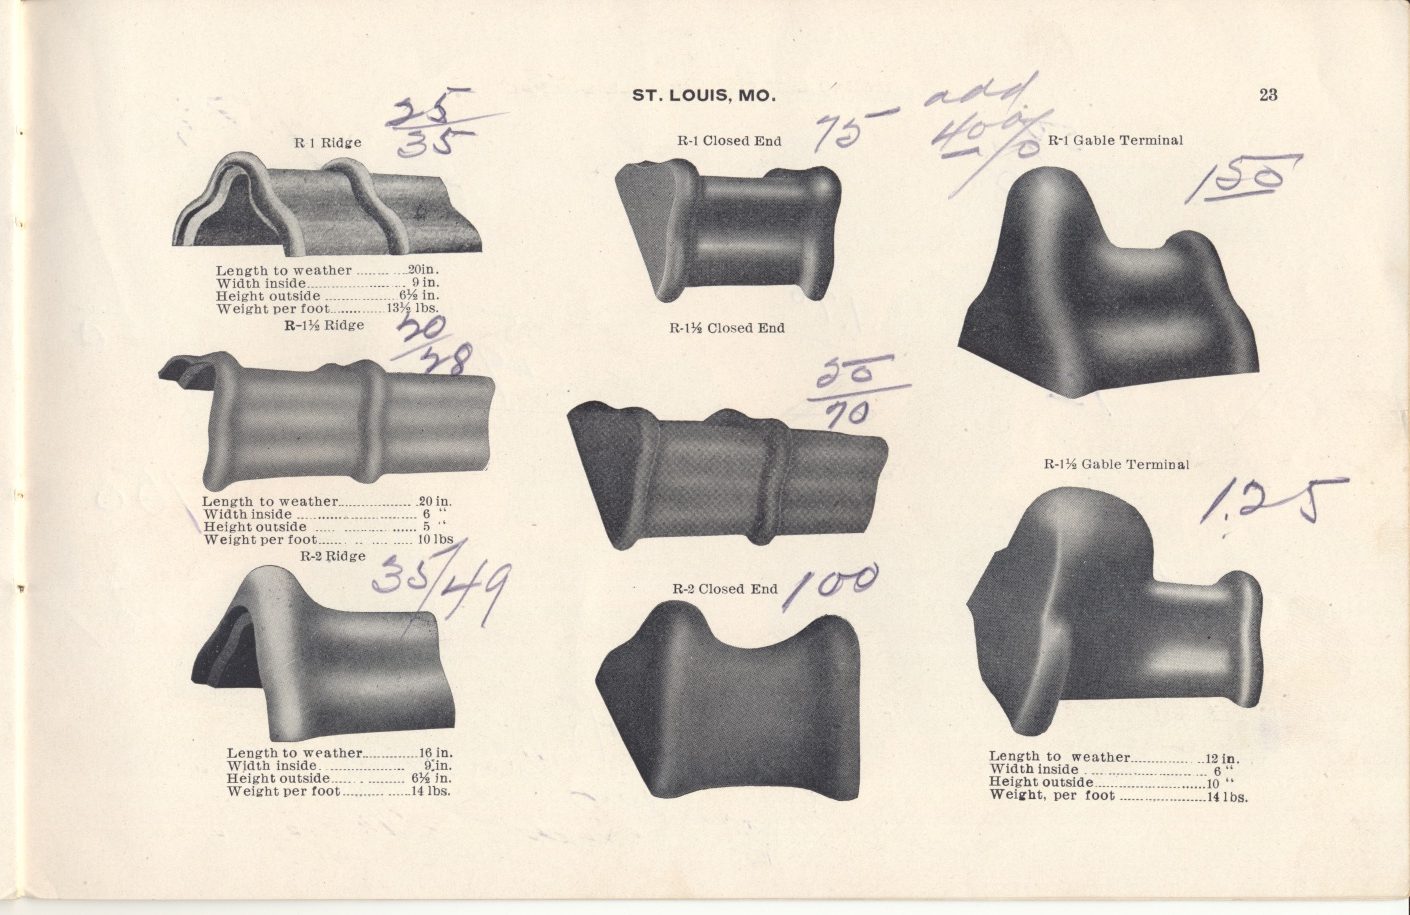
This illustration shows three ridge tile and there lengths, widths, heights, and weights. Along with illustrations of three Closed End tile and two Gable Terminals.
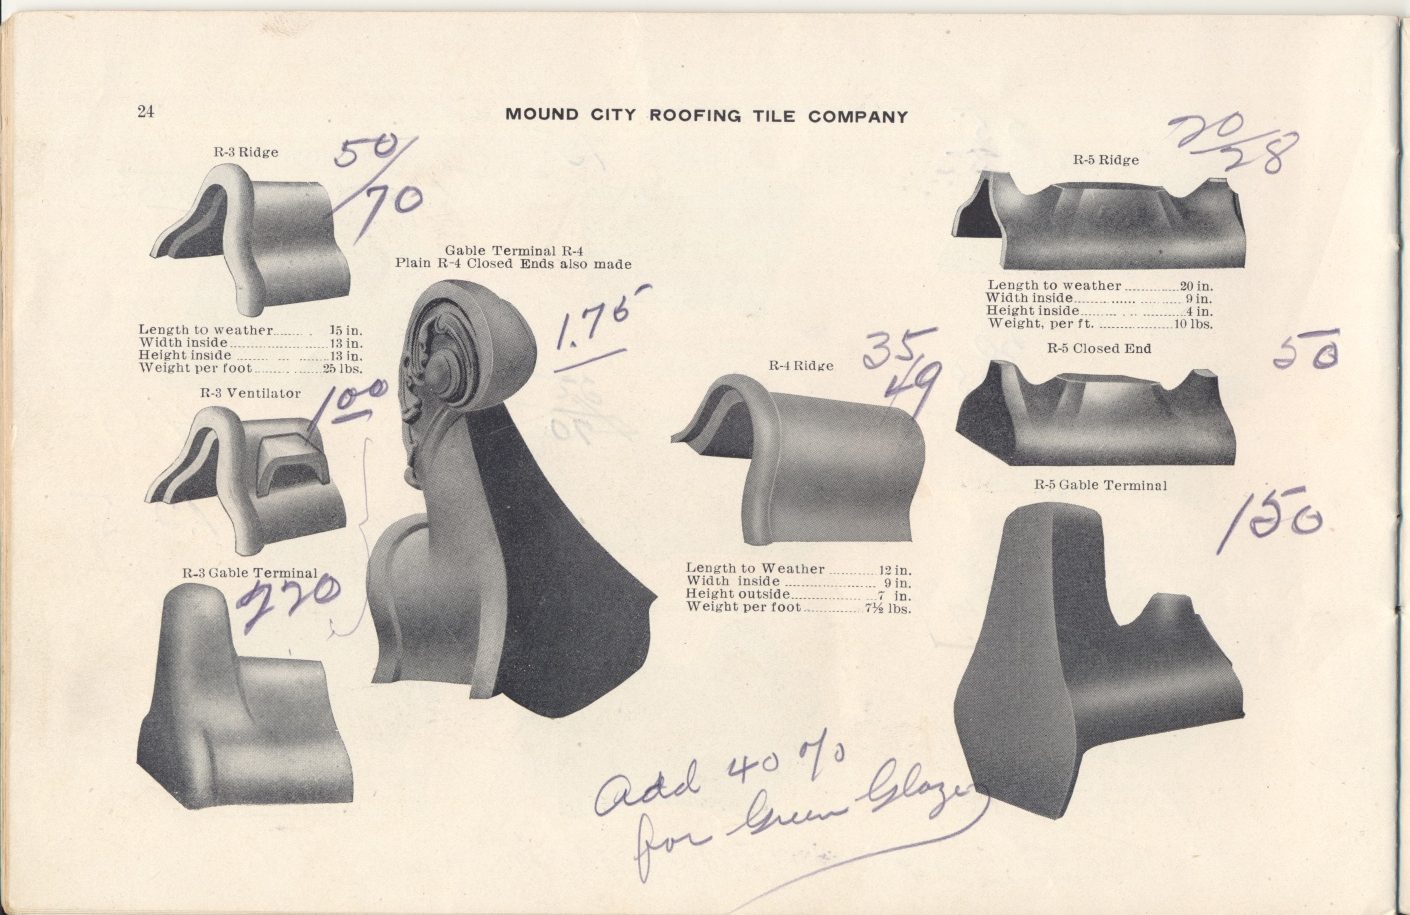
This illustration shows three Ridge Tiles and the lengths, widths, heights, and weights for each of them. Along with illustrations of one Ventilator tile, one Closed End Tile and three Gable Terminals.
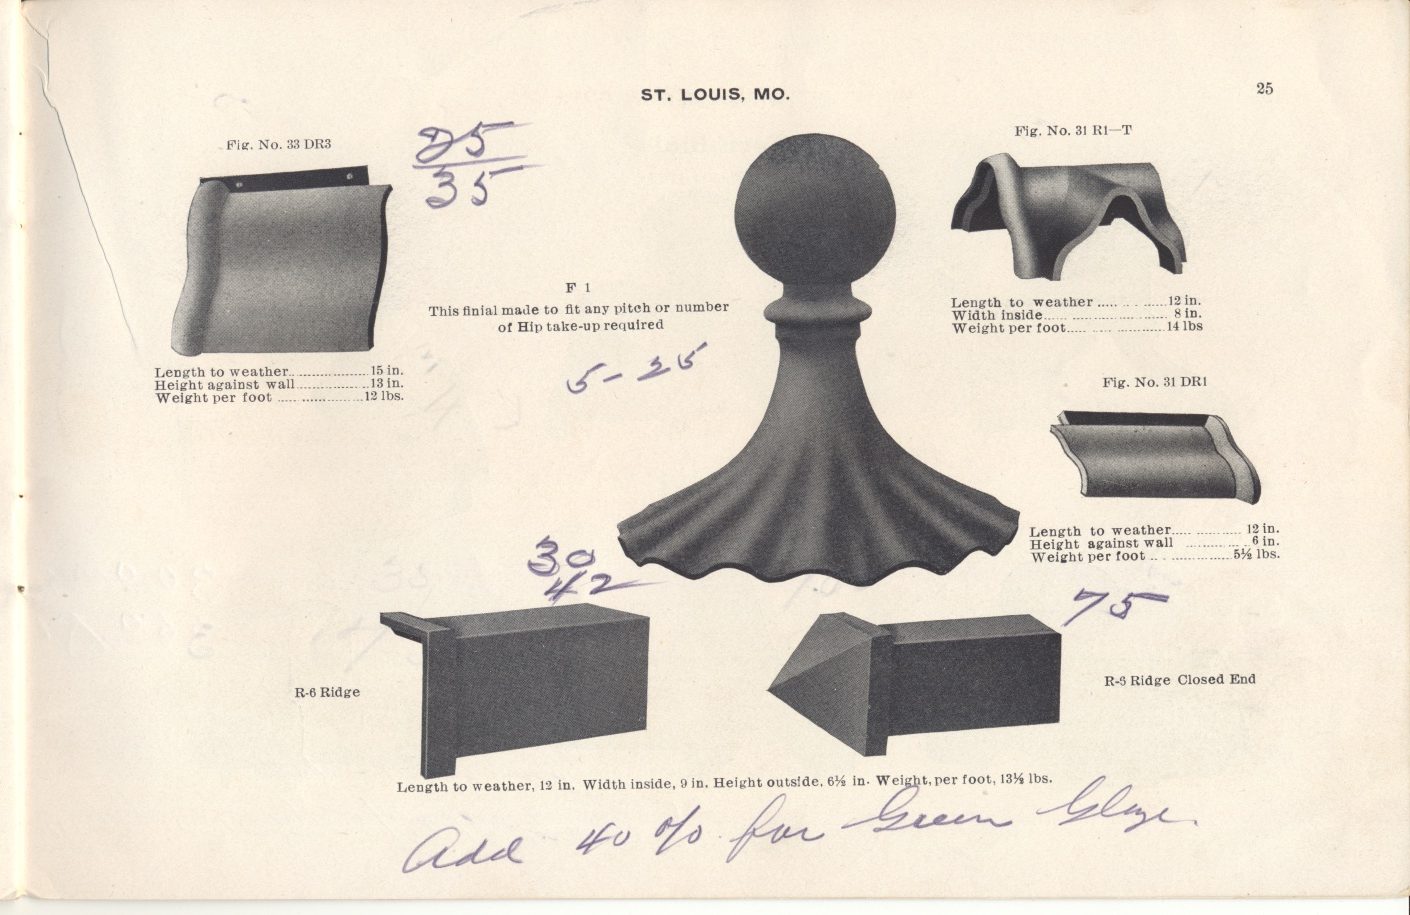
This illustration shows three Mound City Roofing Tile and the lengths, widths, heights, and weights for each of them. Along with an illustration of one large Finial, with a Ridge Tile and a Ridge Closed End tile below it.
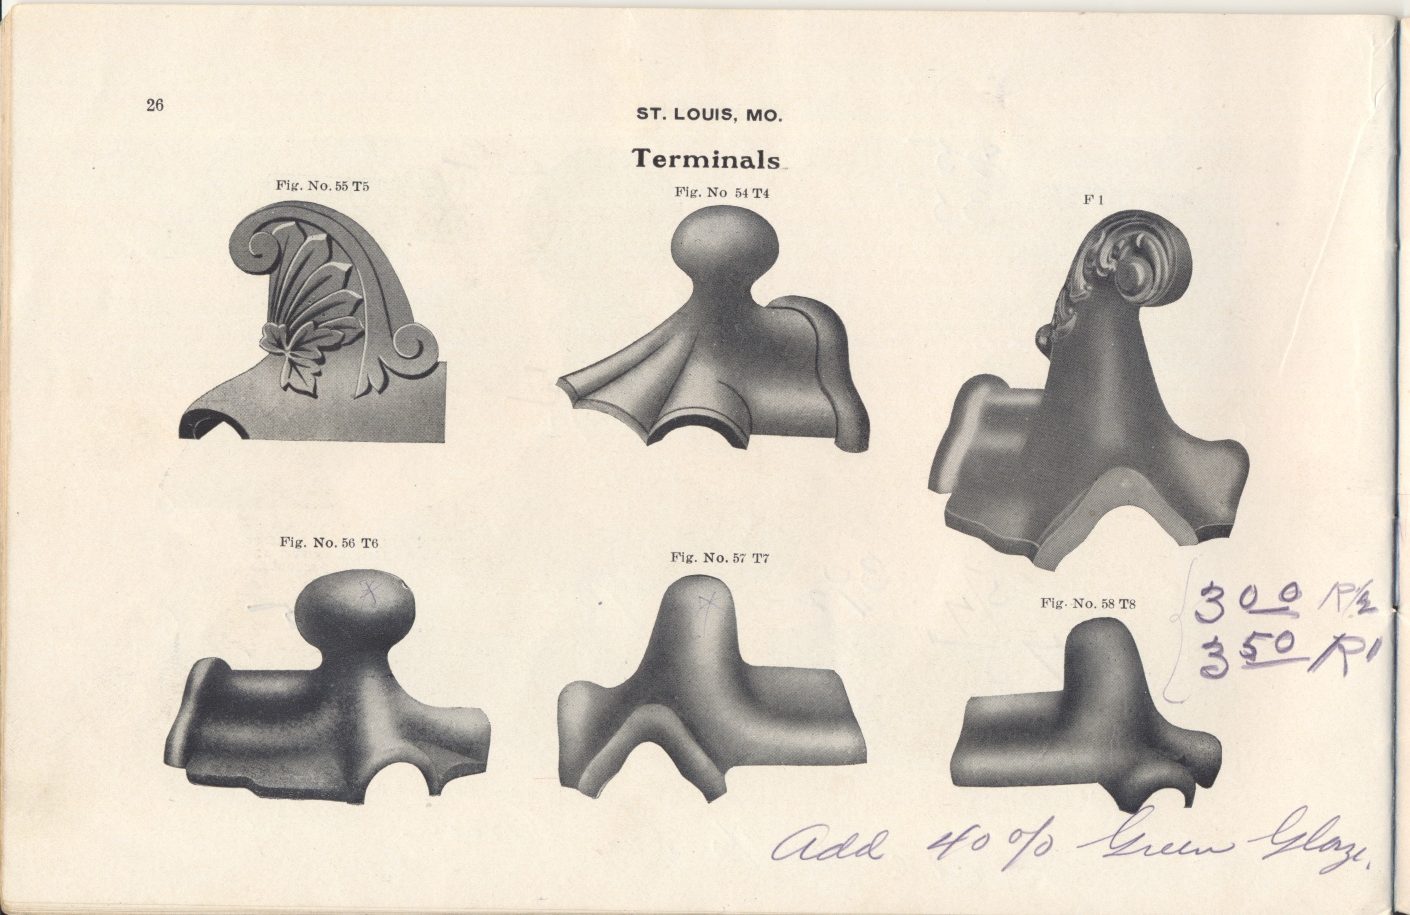
This is an illustration of six varying terminals from Mound City Roofing Tile Company.
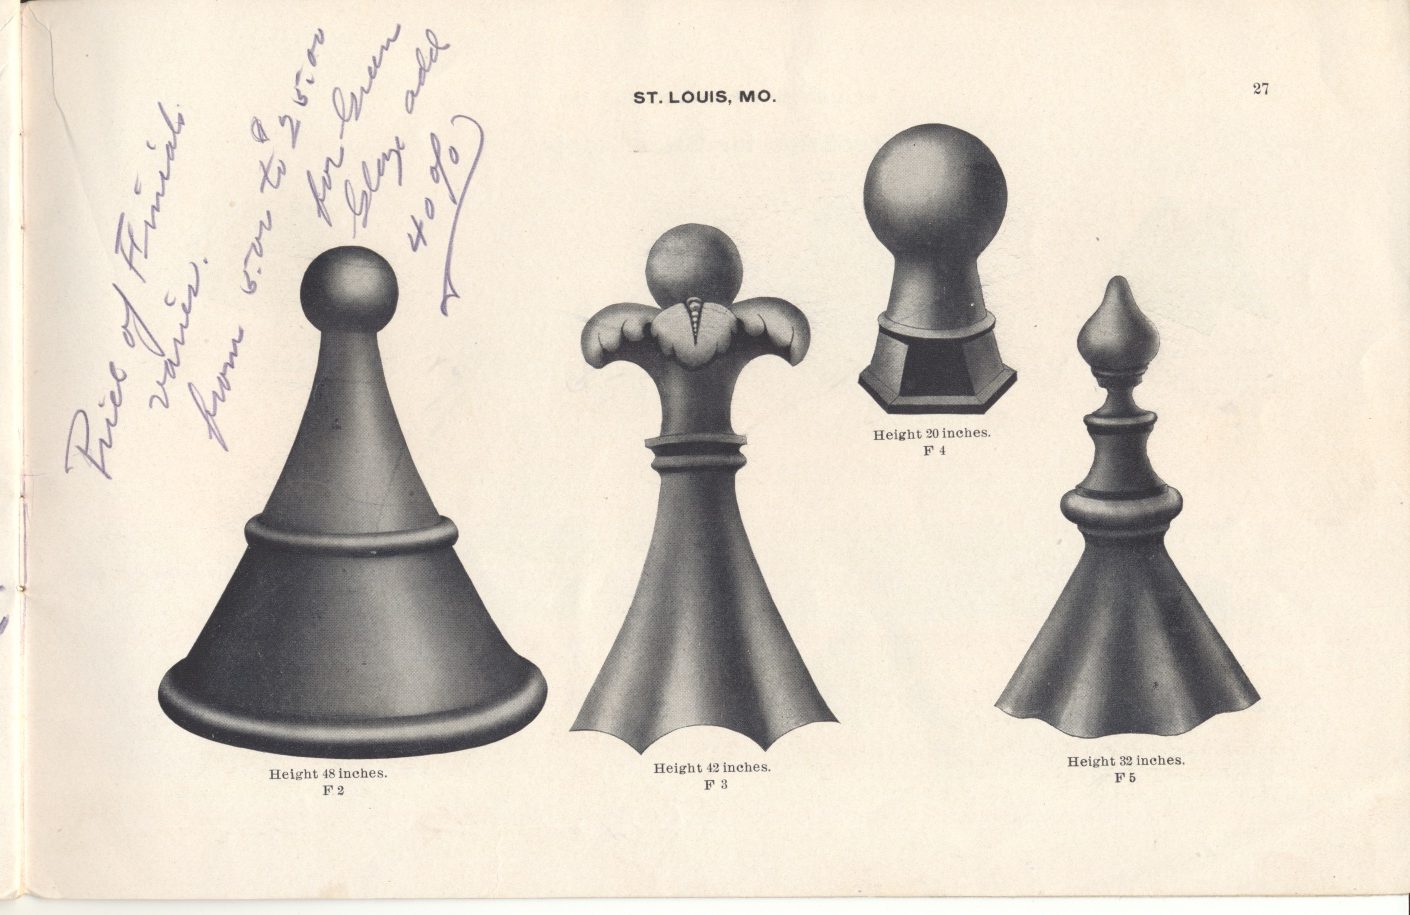
This is an illustration of four varying finials from Mound City Roofing Tile Company. From left to right, the first has a height of 48 inches, the second has a height of 42 inches, the third has a height of 20 inches and the fourth has a height of 32 inches.
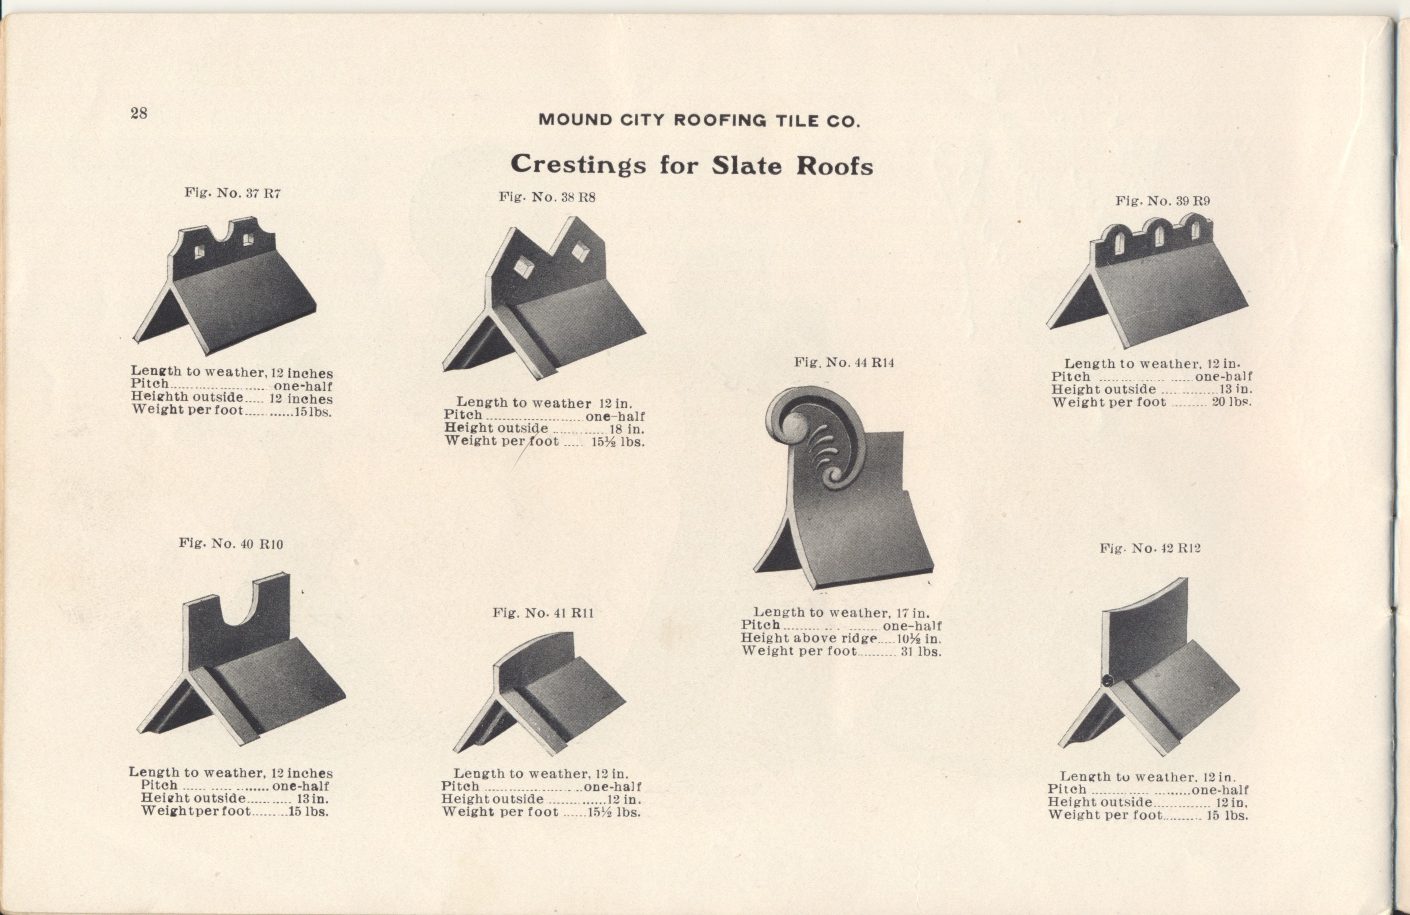
This is an illustration of seven varying Crestings for Slate Roofs from Mound City Roofing Tile Company. Each of the crestings has listed the length, pitch, height, and weight for each of them.